
Fabric always makes me happy… especially with new sewing projects and our baby girl coming in July. Also helps that two of my best friends are having girls within a month of us. Here are some recent fabrics for a little girl blanket. Soon after I’ll be getting started on the baby bumper and quilt.
Showing posts with label Fabric. Show all posts
Showing posts with label Fabric. Show all posts
Monday, April 11, 2011

Saturday, March 26, 2011
Baby Gift Set
My go-to gift for last minute showers or when I’m in a time crunch for a friend’s new baby: onesie and matching burp rags.


Wednesday, January 26, 2011
Easy Window Box Covering / Pelmet Box
I love online tutorials because they allow me to do a project in a way that I like, while still having some guidance. Here’s my latest project for our downstairs bathroom.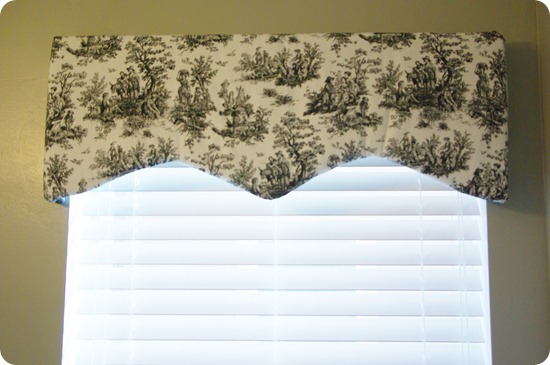
This is the perfect way to dress up a window without any drapes. I also like that it looks a lot more clean and simple than drapes. (And who wants drapes in their bathroom??)
None of the online tutorials provided a great way to mount it, so my handy-man husband attached it to the valence cap of our white blinds——now there are no holes in the walls. We really like it, and for a 20 minute project with foam core you can’t go wrong.

This is the perfect way to dress up a window without any drapes. I also like that it looks a lot more clean and simple than drapes. (And who wants drapes in their bathroom??)

None of the online tutorials provided a great way to mount it, so my handy-man husband attached it to the valence cap of our white blinds——now there are no holes in the walls. We really like it, and for a 20 minute project with foam core you can’t go wrong.
Thursday, January 20, 2011
Tutorial: Recovering a Lamp Shade
This is one of those projects that is really useful to spruce up a space. I purchased a lamp I loved… only problem was the stark white shade. I wanted the shade to go next to our office furniture, which is an off-white color. After assembling the lamp I realized the shade is custom fit to the base, so no other shade could fit. I had planned on buying a new shade, but that option was out.
So I found a couple tutorials online, merged some ideas together, and altered some of their suggestions to finish this project.
We love our lamp.

Here’s how you do it: start with your shade, a fabric of choice—only about 1/2 yard depending on your shade size (I recommend a thicker décor fabric), fabric glue, fabric scissors, tape, and a pencil. Pretty simple so far, right?

Lay your fabric out with your shade. Place the shade in the middle, then roll it to the right to trace it’s angle to one side, then roll back to the middle, then roll to the left to trace its angle for the other side. Trace both the top and bottom of the shade as you roll it. This will ensure the fabric follows the shade curve.

Next, add two inches to each side that you traced, and cut two inches away from this line. You’ll need to leave extra room on either side to fold. Then iron, iron, iron your fabric. Make sure all seams are out.
Then, take the fabric end and match it up to your shade’s seam. Before you glue it, hold it in place to make sure it is aligned to cover the shade evenly as it rolls around. Then run your fabric glue along the seam and secure the fabric end. If you have a thick fabric, you won’t have to worry about the glue showing through; if you have a thinner fabric, smear the glue with a paintbrush.

All other tutorials I read said to pull the shade around and tape it back at the original seam. I tried this and realized the shade wasn’t pulled nearly tight enough this way. I wanted it really really tight. So I began pulling the fabric as tight as I could, then gluing about every 6 inches around.
By the time I’d glued it all the way around, it was tight and easy for me to cut and fold the ends in without disturbing the body of the shade.

After it’s all glued, cut around each side, leaving about 1/2 inch of fabric to glue under.

Then fold the seam under all the way around to make sure it looks even.

And glue.

When you get to your final edge, glue it under so it follows the shade’s seam nicely.

That’s it! Very easy. Place your shade on and admire it.


Tuesday, January 18, 2011
Onesie/Burp Rag Gift Set

Using a plain onesie (I buy them a bit big, as the sizing is always too small, for Gerber anyway), measure and trace a shape or letter of your choice onto fabric. Cut it out and sew the edges back.


Center width-wise and place a bit high on the shirt (so if the babe is wearing pants it won’t be covered). Sew through the middle and double stich around the edges.

Pair with some matching burp rags for an easy but cute gift. For one friend I did this after the baby came so I could do an initial of her name on the onesie. Personalized baby stuff is the best!


We had a last minute shower last week so I didn’t have time to make a blanket, but this was pretty quick.
Monday, January 17, 2011
Fabric Sale
Love getting home fabrics for $3/yard! More to come on my projects with these.


Sunday, December 12, 2010
More Baby Gifts
I’ve been sewing up a storm over the past couple months… many baby blankets, nursing covers, onesies, burp rags, etc. for friends and family having babies soon. I haven’t remembered to take pictures of them all, but here are some. These things have become my go-to gifts for showers.
Blanket for my friend having a baby girl.

I am a huge fan of this binding—so silky.

Here’s the nursing cover I made to go with it.

And a set of matching burp rags.


I have a couple more I wish I had shots of, so I’m hoping I can document better moving forward.
Subscribe to:
Posts (Atom)


