Monday, August 19, 2013

My Grandma’s 4 Ingredient Hot Fudge Sauce

  1 comment    
categories: , ,
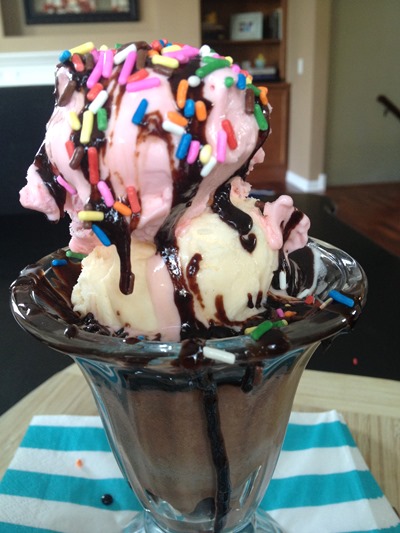
This recipe has been with the women in my family for generations. My great grandma taught it to my grandma who taught it to my mom who taught it to my sister and I. It is the original “magic shell” gooey, gets sticky when it hits the ice cream, tastes like spoonfuls of buttery chocolate hot fudge. So much better tasting than store bought.
HotFudge
Ingredients:
- 1/2 c. cocoa powder
- 1 1/4 c. white sugar
- 1/4 c. (1/2 stick) butter)
- 1 tsp. vanilla
- a little trickle of water
In a saucepan measure out cocoa powder and sugar. Whisk dry ingredients together and then hold saucepan under the sink faucet and add a tiny amount of water, just enough that the mixture can be stirred together with the whisk (estimated a couple tablespoons).
Whisk until sugar, cocoa, and water are well combined. Place onto stovetop on medium-high heat and bring to a simmer/slow boil. Let simmer for 1 minute, then remove from heat, add vanilla then butter and continue to whisk. Let cool for a couple minutes before serving over ice cream if you’d like it to have a thicker texture, but serve immediately if you like it runnier.
Stores great in the fridge and can be reheated. It is thick, chocolatey, buttery, and delicious. We make it whenever we have friends over for ice cream. And kids love it! We also love Neapolitan ice cream.
IMG_9332 IMG_9345IMG_9340

Friday, August 16, 2013

The Food Your Kids Love…

  No comments    
categories: , ,
KidFavorites
A constant battle I face as a mom (to kids who are very scant and picky eaters) is what to make for dinner. They love their fruits and even some veggies, but they won’t touch a lasagna, taco, salad, soup, or anything mixed up for that matter with a 10 foot pole. When we serve meals like pasta dishes or rice and veggies they end up eating about nothing and asking for a snack before bed. We try and will keep trying to get them to like these meals but on the weekends it’s nice to have a break and give them some food they love (i.e. chicken, fries, etc.). I’ve heard these kinds of meals referred to as the “400 degree special”. One mom blogger I read wrote something about how she’d let her kids throw anything frozen on a pan and bake everyone’s at 400 degrees… burritos, pizza rolls, fries, etc.
As someone who tries to eat very clean (and worked at a health food store in college), I never thought I’d be a mom to let my child eat french fries or fried chicken at home for dinner! But after having kids you learn that sometimes you do need to give in (albeit not every day). To ease my mind and try to help our kids get slightly healthier versions of these frozen favorites, I have some tips for making them healthier.
French Fries: the best tip to make these healthier is to spend an evening once a month chopping potatoes and putting them in Ziploc bags to freeze. Just toss them in a bag with a little bit of olive oil and some salt, then seal tightly and freeze for up to a month.
%20%28Bill%20Hogan/Chicago%20Tribune%29
If you have to buy from the store, make sure you read the labels. Buy french fries without additives especially hydrogenated oils (which are linked to colon cancer).
Fried Chicken: make sure when buying these to avoid patties, nuggets, and anything that contains random parts of chicken meat mashed together. Try to buy all breast meat chicken.
My kids don’t like hamburgers but they do like hot dogs. I always buy Hebrew National kosher all-beef hot dogs. They don’t contain corn syrup or mechanically separated meats like lots of hot dogs, but they do contain nitrites which are still harmful and linked to cancer. Eat hot dogs sparingly, but when you do choose a good quality hot dog!
Also, my last trick for “unhealthy food night” at our house is green juice. We love making green smoothies for breakfast, but at dinner this Naked juice comes in handy. It’s full of fruits, vegetables, and nutrients. Also it’s sweet so my kids LOVE it. They will drink a huge 64 oz bottle in 2 days! (Also the cheapest place to find this is Costco! It’s $2 cheaper than Wal-Mart and $3 cheaper than Target.) Add this to your kids’ meals and you can feel a tad healthier on those lazy dinner nights.

Thursday, August 15, 2013

Homemade Pico de Gallo

  No comments    
categories: , ,
PicoDeGallo
Pico is one of those sides to a meal that is fresh and easy to make, yet I rarely find myself thinking to make it. Pico tastes great with any Mexican dish you make—enchiladas, tacos, chimichangas, taco salad, nachos, etc. I made it last weekend to pair with some enchiladas and I have to say it was a great complement to the creaminess of the enchiladas. Pico just makes anything taste fresh.IMG_8975
Here’s how I made mine: 
- Fresh cherry tomatoes (1-2 handfuls), 1/2 bunch fresh cilantro, one large red tomato from the vine, 1/4 diced onion, garlic salt and black pepper to tasteIMG_8980IMG_8969IMG_8968 
IMG_8973
Dice all ingredients and combine to taste. Tastes great chilled as well

Saturday, July 27, 2013

Fresh Corn & Avocado Salad

  7 comments    
categories: , , , ,

I found this recipe from Authentic Suburban Gourmet. It is the PERFECT salad for summer! I cannot tell you how fresh it tastes. Just make it. Every BBQ or party I’ve taken it to it’s been a total hit and people are scarfing it down. It’s healthy and it’s delicious. So nice to have some healthy options at summer parties or picnics. And because it’s meat free, dairy free, grain free anyone can eat it.
IMG_6283
Here is her recipe. My only advice is don’t use all the dressing or it will get a little too soggy at the bottom (and  dress it right before you’re going to eat it).
Also, I doubled the recipe for a large BBQ and omitted the Feta cheese.
Ingredients:
5 Ears Corn, husk removed, brush with olive oil and grilled, remove corn with sharp knife
2 Avocado’s, diced and sprinkled with lemon juice to prevent browning
2 C. Tomatoes, red and yellow cherry variety or equivalent
1 Small red onion, finely diced
¾ C. Feta, crumbled
1 ½ C. English cucumber, skin on and chopped small dice
Add to a large bowl and refrigerate until ready to use.
Cilantro Vinaigrette
6 T. Olive oil
2 T. vinegar
1 t. Garlic powder
2 T. Fresh cilantro, minced
½ t. Salt
10 Grinds of fresh ground pepper
Add all of the above ingredients in a small glass jar with a lid. Shake really well. Taste and adjust seasoning and ratios of oil and vinegar as you desire. When ready to serve salad, add the dressing and gently toss. IMG_6282


Thursday, July 25, 2013

Strawberry Maple-Walnut Salad

  No comments    
categories: , , ,
Strawberry Maple-Walnut Salad
Made this for a BBQ last weekend. So simple and fresh! I just love salads with fruit in them. Ingredients: spinach, strawberries, walnuts (or any kind of nut you’d like), maple syrup, feta cheese, poppy seed dressing & a pat of butter (not shown).Strawberry Maple-Walnut Salad
I love carmalized nuts. Maybe a little too much! When putting them in a salad I always make them first and then let them chill in the fridge before topping the salad. In a skillet warmed to medium heat, place a large pat of butter and let it melt. Throw the nuts in (un-chopped) and make sure there is enough melted butter to coat them. The butter helps the maple syrup from burning and sticking to the pan (and it tastes good too ;).
Once the butter is melted, then pour some syrup in, enough to coat. Real maple syrup tastes so good when it caramelizes down.
It should look a little bubbly like this:
Candied Pecans -How-to
Let it bubble for a couple minutes until all the nuts are well coated. Then turn the pan over onto a cutting board, spread the nuts out and chop them. I like them chopped small but you can do whatever you like best. Candied Pecans -How-to
Next grab your strawberries and wash them with cold water. I like to quarter them. Strawberry Maple-Walnut SaladStrawberry Maple-Walnut Salad     
This meal is great for family dinners too because our little kids just eat the strawberries separately. Mmmm.Strawberry Maple-Walnut Salad

Monday, June 10, 2013

More Baby Blankets

  No comments    
categories: ,
My favorite part of sewing gifts for friends is trying to find a fabric that fits them. Below are some recent blankets, one for a friend, one for my sister, and two for my baby boy. Thank you satin blanket binding for making it so easy to sew some nice giftsIMG_3720IMG_3986 IMG_3447   IMG_3725

Saturday, June 8, 2013

School-Time Nook

  No comments    
categories: , ,
Because all of my kids are at home during the day still, I love to do school-time with them. We’ve don’t it for a little over a year now. Emerson only went to preschool one day a week last year so that left us a lot of time at home. Even though it’s hectic at home with 3 young kids, I feel like having school time every morning, even for 15 minutes, really helps the kids get into a routine for the day and helps fundamental concepts come easily to them. IMG_3220
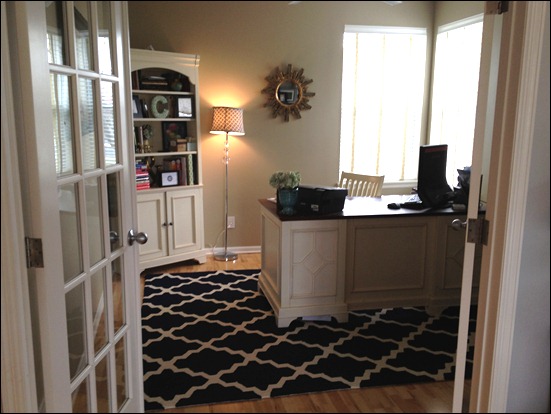
We don’t have one of these giant homes you see on Pinterest with rooms dedicated specifically for crafts or school time, so I made a make-shift school area in a nook of our office. Here is a photo of our office. The nook is just to the right, around the corner from the doors. I like this also for visual appeal so the big kids’ posters aren’t the first thing you see when you walk in. IMG_3512
I got all my supplies for the school nook at the Dollar Store, just after my oldest turned 2. I purchased a calendar, days of the week, weather, alphabet, numbers, shapes, and a bunch of sets of flash cards and quiz cards. I keep all my supplies in the bins of this IKEA shelf: I think all my supplies cost about $20!IMG_3221
We have special “mats” we each sit on for school time (they are just old placemats!) and the kids love it! We sing a song that goes like this “come on over and sit right down” repeated with lots of fun gestures like “come on over and stomp your feet” or “clap your hands” to start school. The kids love being crazy with it “come on over and bark like a dog or pat your cheeks” etc.IMG_3228
We try to do the basic things each day (month, day, weather, alphabet, counting) and then we focus on one learning activity for the day. Sometimes we learn about a unit theme like animals or the ocean, sometimes we learn how to mail letters, and sometimes we just color! And really it lasts about 15-20 minutes. I am going for repetition here not length! While Emerson works on his coloring or Hot Dots, I work on simpler concepts like the alphabet with Genevieve.IMG_3223 
// Just a quick shout-out about Hot Dots – my kids LOVE them. a while ago my mom bought us a ton of these off Zulily  (like enough to teach concepts from age 3 to age 11 – about 50 boxes!) They teach quickly and easily and the pens are so fun for the kids, plus they can generally do them on their own once you get them going! I highly recommend them. //

Ombre 1st Birthday Cake (& Party)

  1 comment    
categories: , , ,
Just catching up on some old photos and parties. Last summer our baby girl turned 1 and we threw a little party for her. I made a small “smash cake” for her and then made cupcakes for the party guests.IMGP7014
To top the cake and make some height I revised her party invite to say Happy Birthday, printed it off and taped it to a paper straw, then stuck it in the cake. Simple!IMGP7018
The rest of the food was simple—Costco fruit, muffins, quiche and individually packaged snacks for the kid guests (juice boxes, string cheese, etc.).IMGP7046
I framed her birth announcement on the table for an easy decoration:IMGP7019 IMGP7022  IMGP7051
Quick thank you favors—lollipops tied with a thank you tag.IMGP7080     
My favorite easy detail were these cupcake flags from Target’s Sprtiz line. They have the best party items!IMGP7035   
All in all this girl was happy so I’d say it was a success! (She loves her daddy too ;)IMGP7037

Kids Room in a Closet

  No comments    
categories: , ,
When we moved to Minnesota the only house we could find that we liked had 3 bedrooms. We thought we could easily just move when we had another baby, but that ends up being a lot more complicated than I’d thought especially when we have a great location, great landlords, a house that is really nice, and great neighbors. Even when we looked at the possibility nothing seemed to be right, even when we were pregnant with baby #3.
Cue discussions of how to successfully house and sleep 3 children ages 3 and under. We really love the idea of kids sharing rooms… when they are older! There’s no way our 3 year old and 21 month-old would be sleeping through the night sharing a bunk bed, so we got creative. With a newborn we just had to have our other kids sleeping well! Once we realized the closet had circulating air we went for it.
Here is the closet of our son’s room, made-over for our baby girl Genevieve. Kids Room in Closet
The toddler bed fit perfectly (purchased at Target, similar here). I used the quilt I’d made for her crib (see here), added a couple touches from her baby nursery like the scalloped banner (see tutorial here), paper lantern, and some art, and voila – a closet room! She loves her space! The kids love to play in it too.Kids Room in Closet 2
We added a G to the door, a “vous etes mon soleil” print, a stuffed elephant, and the scalloped banner. We think it’s pretty cute and very functional.Kids Room in Closet 4

Vegetarian Chili (with Fritos & veggies)

  No comments    
categories: , , ,

I love chili mixed with veggies. For some reason the fresh veggies with the heavier feel of chili tastes great (maybe it’s just the really cold Minnesota winters that make me crave chili?). This meal is great for my husband too because it feels hearty to him even though there’s no meat.IMG_3324.JPG (2)IMG_3327.JPG (2) I make my chili in the Crockpot, spoon it over Fritos and add diced tomatoes, avocado, lettuce, and either Greek yogurt or cottage cheese. Omit the yogurt/cheese and you have a great vegan dinner too.
Vegetarian Chili:
  • 1 onion diced
  • 1 can kidney beans (including liquid in can)
  • 1 can white beans (including liquid in can)
  • 1 can crushed tomatoes or diced fresh tomatoes
  • 1 can corn
  • 1 heaping tbsp chili powder
  • 1 tsp cumin
  • 1 tsp coriander
  • 1/2 tsp garlic powder
  • 1/4 tsp (or a bit less) cayenne pepper
  • 1/2 tsp salt

Monkey Bread

  No comments    
categories: , , ,
Next time you’re making rolls, bread, or pizza dough, save a little extra dough to make this delicious dessert. My husband loves anything with cinnamon so we have this a lot. Below is my basic bread/dough recipe.  IMGP4147 IMGP4151 IMGP4152
- 2 tablespoons or packets of yeast
- 2 cups warm water
- 3 tablespoons agave nectar (or sugar works)
- 3 tablespoons olive oil
- 2 tsp. salt
- 5 – 6 c. flour (when making bread it tastes great to use half white flour and half wheat flour)
Combine yeast and water in stand mixer. Mix until incorporated with dough hook. Add sugar to activate yeast and mix for 1 minute. Then add olive oil. After adding 1 cup of flour, add salt, and then continue with remainder of flour.
Once combined in mixer, remove and knead into a large ball with hands. Let rise on greased cookie sheet for approximately 30 minutes – 1 hour. Punch down dough and shape into pizza, rolls or bread loaves. Bake rolls at 350 for 10-15 minutes or pizza at 425 for 10 minutes then add toppings and bake for another 5-7 minutes.
For monkey bread, let dough rise, then punch down and form small balls. Dip the balls in melted butter and roll in a brown sugar and cinnamon mixture, placing in a bread pan after coated. Let rise again for 30 minutes and bake at 350 degrees for  about 15 minutes.